Descripción
Simple Tour Guide es una guía de usuario paso a paso fácil de usar que te permite crear un recorrido guiado interactivo para tus visitantes.
El plugin proporciona una forma estupenda, limpia y rápida de presentar a los usuarios su producto o servicio, guiándolos visualmente a los diferentes elementos de tu web.
Un recorrido interactivo del usuario es una manera eficaz de mejorar la experiencia del usuario y la satisfacción del cliente. Este plugin está basado en Shepherd.js – una biblioteca vanilla js ligera de código abierto para recorridos guiados.
Personaliza el texto, el número de ventanas emergentes (pasos) y el enlace a cualquier elemento del DOM a través de una sencilla interfaz de administración.
Opciones del plugin
Puedes crear un recorrido y añadirle tantos pasos como quieras desde la pestaña «Crear un recorrido». Puedes añadir el título del paso, la descripción del paso, vincular el paso a un elemento dom específico y añadirle una clase personalizada. También puedes elegir mostrar el recorrido sólo una vez o mostrarlo cada vez que recargues una página (modo de prueba) y pedir confirmación cuando se haga clic en el botón de cierre. Otra característica interesante es la posibilidad de elegir en qué páginas mostrar el recorrido. Si quieres, también puedes elegir mostrar el recorrido sólo a los usuarios registrados y desactivar el resto del sitio mientras el recorrido está activo. También puedes añadir una barra de progreso para mostrar a los usuarios cuántos pasos quedan hasta el final del recorrido y personalizar los colores de los botones de los pasos y de la barra de progreso a través de la pestaña «Estilo».
Capturas
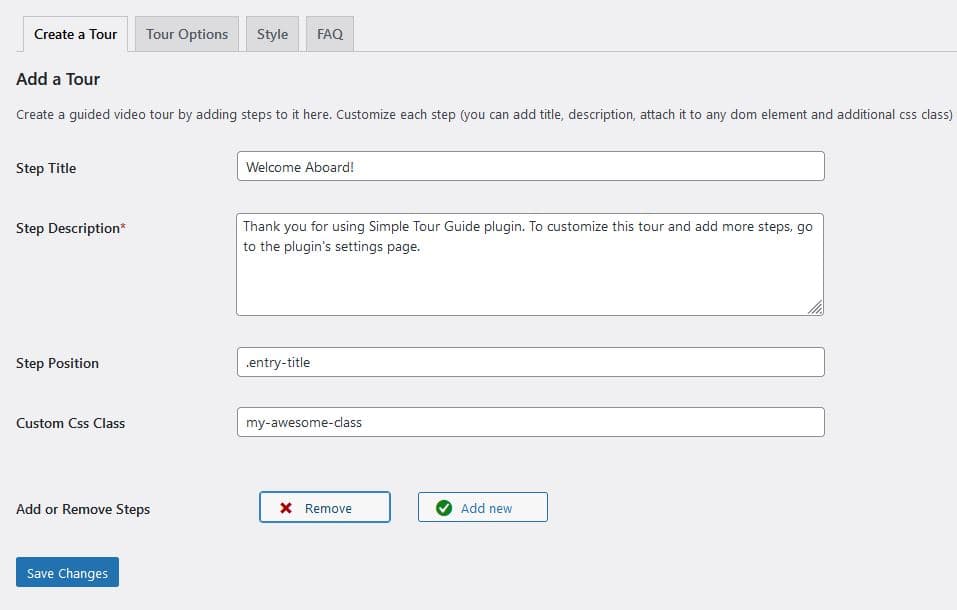
Página de ajustes del plugin: Añadir pasos 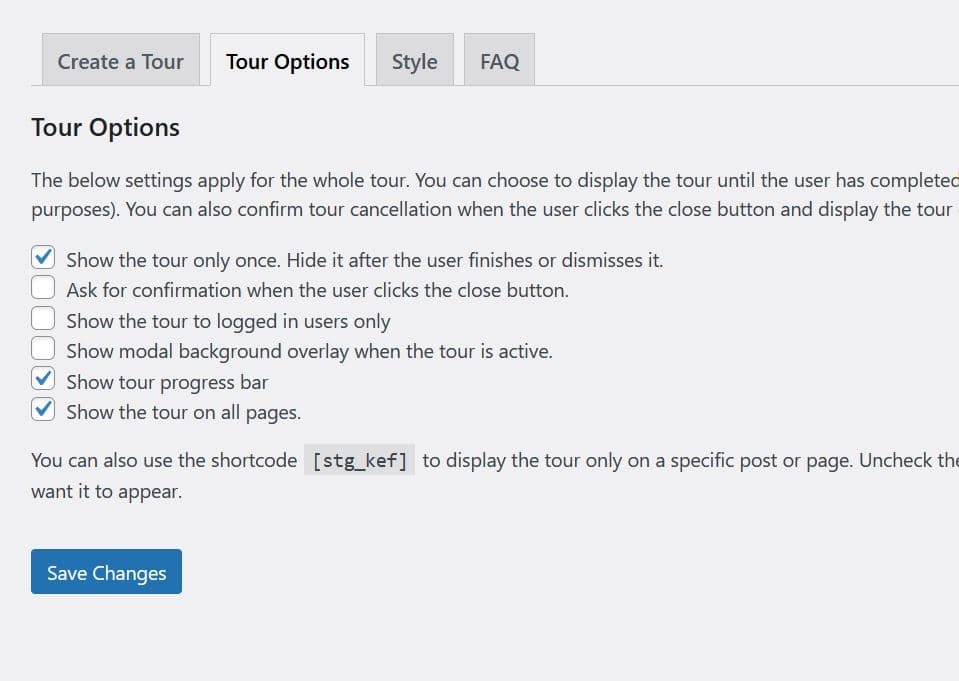
Página de ajustes del plugin: Opciones del recorrido 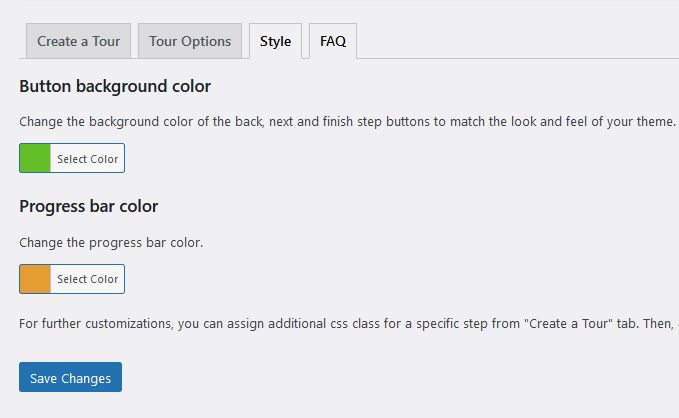
Página de ajustes del plugin: Opciones de estilo 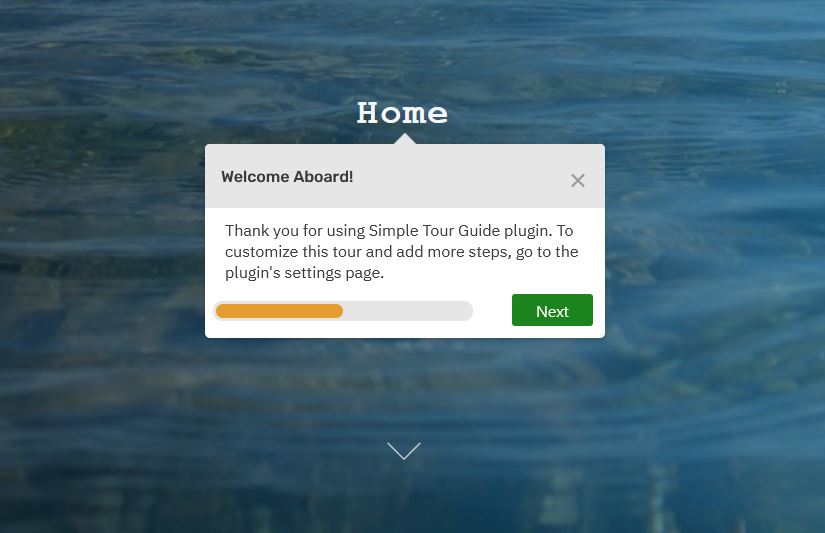
Vista pública del plugin
Instalación
- Take the easy route and install through the WordPress plugin installer or download the .zip file and upload the unzipped folder to the
/wp-content/plugins/directory - Activa el plugin a través del menú «Plugins» en WordPress
FAQ
-
¿Cómo añado, edito o borro pasos?
-
From the WordPress admin, go to Settings => Simple Tour Guide and add as many steps as you want.
-
¿Puedo enlazar un paso con un elemento de la página?
-
Sure, you can! Inspect a page element with the browser dev tool (right click with the mouse => inspect element) and then add its selector in the «Step Position» field from «Create a Tour» tab. You can add class, id or tag selector like so:
.class,#id,tag. If you do not assign a selector, that is also fine, the step will appear exactly in the middle of the screen. -
¿Puedo mostrar el recorrido una sola vez?
-
Absolutely! In fact, by default the plugin hides the tour when the user finishes or dismisses it. However, you can also choose to display the steps on every page reload (test mode) from the «Tour Options» tab.
-
¿Cómo muestro el recorrido guiado solo en una página?
-
Go to «Tour Options» tab, uncheck «Show the tour on all pages» box and copy the plugin shortcode
[stg_kef]. Then, navigate to a page or post you want, click"edit"and paste the shortcode on the top of the post content. -
¿Cómo personalizo el estilo de los pasos?
-
Go to «Style» tab and customize accordingly. For additional customizations, you can use the
.stgclassname or add a custom class to each step from the «Create a Tour» tab. Go toАppearance => Customize => Additional cssand add your own custom styles there. -
¿Puedo crear más de un recorrido?
-
The plugin currently supports only one tour, however you can add an additional tour. Check Shepherd.js documentation on how to do it, as well as the last question in this section (you would need to add some custom code to make it work).
-
¿Puedo añadir una capa al fondo para desactivar el resto del sitio mientras el recorrido esté activo?
-
Yes, this feature is available since version 1.03. All you need to do is check the option «Show modal background overlay when the tour is active» in the Tour options tab. This will disable any site interaction until the user has finished or dismissed the tour.
-
El recorrido se detiene cuando enlazo un paso con un elemento que no está visible. ¿Qué puedo hacer?
-
This may happen when you link a step to a page element that is hidden with css on specific screen sizes. For example, a menu item on mobile that is hidden until the user opens the menu. If the user has not opened the menu yet, the tour might stop in the middle. Luckily, there are a few ways to handle this.
La forma más fácil de corregirlo es no adjuntar el paso con el elemento y el paso aparecerá en el centro de la pantalla.
Since version 1.04, you can skip a step if the element which is attached to it appears off-screen. All you need to do is go to «Tour Options» and add a tick to «Skip a step if a step is attached to an element but the element is not visible». Please note that skipping a step will not work for elements that are completely non-existent in the DOM (for example content for logged-in users). In this case, the best option would be to use custom css to hide the step.
Another solution could be to «detach» the element from its step for that screen size only. In this way, the step will appear in the center of the screen and the tour will continue to work just fine. Add the following css to Appearance => Theme => Customize:
@media(max-width:62em) {
    .stg[data-popper-reference-hidden]{
        opacity: 1 !important;
        visibility: visible !important;
        left: 50% !important;
        top: 50% !important;
        transform: translate(-50%, -50%) !important;
        pointer-events: auto !important;
    }
    .stg[data-popper-reference-hidden] > .shepherd-arrow {
        display: none;
    }
}
The above code targets mobile and tablet users only and detaches a step that was linked to an element which is not visible.
-
He seleccionado la opción de saltar el paso, pero el paso sigue mostrándose. ¿Qué está pasando?
-
La opción de omitir un paso sólo funciona para los elementos que están ocultos o fuera de la pantalla, pero no para los elementos inexistentes. Si el elemento no existe en el DOM, el paso debería seguir apareciendo en el centro de la pantalla y este es el comportamiento estándar. Sin embargo, aún puedes ocultarlo con css personalizado.
Un caso de uso válido para esto es si tienes contenido adicional para usuarios conectados y quieres ocultar el paso al que está enlazado para usuarios no conectados. Para hacerlo tienes que ir a la página de ajustes del plugin =gt; crear una pestaña de recorrido =gt; clase css personalizada y añadir un nombre de clase a medida para el paso que quieras ocultar, por ejemplomi-paso-oculto. Después de eso ve a Apariencia =gt; Personalizar =gt; CSS adicional y añade el siguiente código:.shepherd-enabled.my-hidden-step { visibility: hidden; } .logged-in .my-hidden-step { visibility: visible; }El código anterior ocultará el paso a los usuarios no conectados, pero seguirá mostrándolo a los usuarios conectados.
-
¿Puedo mostrar el recorrido solo a los usuarios conectados?
-
Desde la versión 1.02, ¡puedes hacerlo! Marca la opción «Mostrar el recorrido solo a los usuarios conectados» en la pestaña de opciones del recorrido
-
¿Puedo ejecutar el recorrido dentro de la administración de WordPress?
-
No, the scope of this plugin is the site frontend only. To display a tour in the CMS, you can try the Custom Welcome Guide plugin.
-
¿Puedo personalizar el recorrido más allá de las opciones existentes?
-
Puedes anular el archivo JS por defecto del plugin y poner en cola el tuyo:
function my_modified_tour() {
    wp_dequeue_script( 'simple-tour-guide' );
    wp_deregister_script( 'simple-tour-guide' );
    wp_enqueue_script( 'custom-tour', get_stylesheet_directory_uri() . '/assets/js/custom-tour.js', array(), '', true );
}

add_action( 'wp_enqueue_scripts', 'my_modified_tour' );
In this way, you will be able to create your own custom tour and get access to all the options provided by the Shepherd.js library.
Happy Coding!
Reseñas
Colaboradores y desarrolladores
«Simple Tour Guide» es un software de código abierto. Las siguientes personas han colaborado con este plugin.
Colaboradores«Simple Tour Guide» está traducido en 2 idiomas. Gracias a los traductores por sus contribuciones.
Traduce «Simple Tour Guide» a tu idioma.
¿Interesado en el desarrollo?
Revisa el código , echa un vistazo al repositorio SVN o suscríbete al registro de desarrollo por RSS.
Registro de cambios
1.1.3
- Add option to display the tour on desktop only.
1.1.2
- Fix bugs when removing steps in TinyMCE mode. Add confirmation check upon deleting a step.
1.1.1
- Clean up code and disable first step removal. Improve UI. Remove unnecessary step initializations before save.
1.1.0
- Add option to add html to steps.
1.0.9
- Fix tour dismisal and validate classnames
1.0.8
- Dismiss tour if the last step is skipped; show skipped steps whenever they are visible
1.0.7
- Use one js file for all supported wp versions. Update translation functions.
1.0.6
- Remove Freemius SDK. Upgrade docs. Minify shepherd js.
1.0.5
- Integrate Freemius SDK
1.0.4
- Add option to skip a step for better ux and rewrite sanitization function for backwards compatibility. Update docs.
1.0.3
- Add option to show dark modal overlay to cover the site until the user has finished the tour.
1.0.2
- Add option to show tour to logged in users only.
1.0.1
- Refactor and optimize decrement count steps function. Hide the tour afrer the user finishes or dismisses it. Update css.
1.0.0
- First publicly available version of the plugin. Update css.